Master React Native KeyboardAvoidingView: Fix Covered Inputs & Boost UX
Struggling with keyboards covering inputs in React Native? Our in-depth guide explains KeyboardAvoidingView, its pitfalls, and better alternatives with code examples. Fix your UX today!
Alright, let's be real for a second. We've all been there. You spend hours crafting the perfect login screen or chat interface in React Native, only to watch in horror as the virtual keyboard slides up and completely covers the text input field you just tapped. The user can't see what they're typing, the button they need to tap is now buried, and your beautifully designed UI is suddenly broken. It's frustrating, it's embarrassing, and it's a surefire way to make users delete your app.
So, what's the deal? Why does this happen, and more importantly, how do we fix it? The answer, my friend, often lies in a React Native component called KeyboardAvoidingView. This built-in component is supposed to be your knight in shining armor, automatically shifting your content up when the keyboard appears. But as many developers have found, using it effectively can be trickier than it looks.
In this guide, we're going to dive deep. We'll break down exactly what KeyboardAvoidingView is, how to use it, when it falls short, and what smarter alternatives you might need. By the end, you'll be able to handle keyboard interactions in your React Native apps with confidence, ensuring a seamless experience for every user.
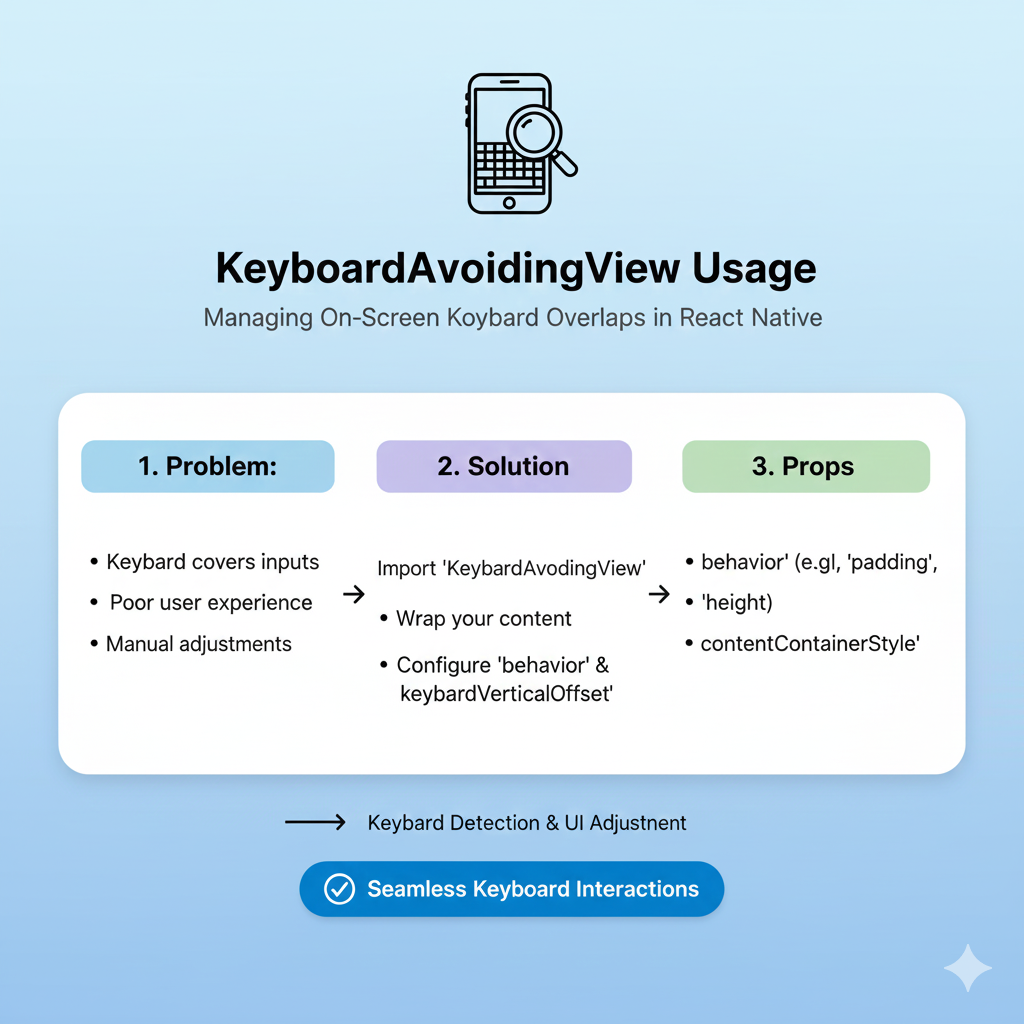
What Exactly is a KeyboardAvoidingView?
At its core, KeyboardAvoidingView is a specialized component provided by React Native. Its sole mission is to prevent the virtual keyboard from obscuring the content the user is trying to interact with. Think of it as a smart container that listens for the keyboard appearing and disappearing, then automatically adjusts its layout to keep everything in view.
Here’s the basic idea: you wrap the parts of your screen that could be covered by the keyboard (usually your input fields and the buttons near them) inside a KeyboardAvoidingView. When the user taps on an input, the component springs into action, adjusting its height, position, or adding padding to ensure that input stays visible.
The Critical "Behavior" Prop: Your Secret Weapon
The magic of KeyboardAvoidingView is controlled by one key prop: behavior. This prop tells the component how to make room for the keyboard. There are three main strategies, and choosing the right one is crucial:
padding: This is often the recommended choice, especially for simpler layouts. When the keyboard appears, the component adds bottom padding equal to the keyboard's height. This effectively pushes all your content up. It's great when you have aScrollViewor a flexible layout.position: Instead of adding padding, this behavior literally moves the entire view upward. This can be useful when you have a fixed element (like a "Submit" button) at the bottom of the screen. However, be warned: if you move the whole view up, content at the very top might get pushed off-screen.height: This behavior changes the actual height of theKeyboardAvoidingViewcontainer itself, shrinking it to make space for the keyboard.
Pro Tip: Official docs and developers often recommend starting with behavior="padding" for iOS. For Android, the default system behavior sometimes handles things well on its own, so you might not need a specific behavior or might use 'height'. But here’s the catch: you must test both platforms. What works on one can fail miserably on the other.
Setting It Up: From Zero to Functional
Let's look at a classic example: a login screen. Without any keyboard handling, the "Sign In" button would be hidden the moment a user tries to type their email.
javascript
import { KeyboardAvoidingView, Platform, SafeAreaView, TextInput, Button } from 'react-native';

export default function LoginScreen() {
  return (
    <SafeAreaView style={{ flex: 1 }}>
      <KeyboardAvoidingView
        behavior={Platform.OS === 'ios' ? 'padding' : 'height'} // Platform-specific behavior
        style={{ flex: 1, justifyContent: 'center', padding: 20 }}
        keyboardVerticalOffset={100} // Crucial for headers & navigation bars
      >
        {/* Your form content is safe here */}
        <TextInput placeholder="Email" style={{ borderWidth: 1, padding: 10, marginBottom: 15 }} />
        <TextInput placeholder="Password" secureTextEntry style={{ borderWidth: 1, padding: 10, marginBottom: 30 }} />
        <Button title="Sign In" onPress={() => {}} />
      </KeyboardAvoidingView>
    </SafeAreaView>
  );
}
See that keyboardVerticalOffset prop? It's a lifesaver. If your screen is inside a stack navigator with a header, the KeyboardAvoidingView needs to know about it. Otherwise, it will push the content up but might still leave it hidden behind the header. You can often get this height from navigation libraries (e.g., useHeaderHeight() from React Navigation) and pass it here.
Want to build real-world apps that handle these complex UI interactions with ease? This is the kind of practical, platform-specific knowledge we focus on in our professional software development courses at codercrafter.in. Whether you're mastering the MERN Stack or diving into Full Stack Development, understanding these nuances is what separates hobbyists from professionals.
When the Built-In Solution Isn't Enough: Common Pitfalls & Better Alternatives
Let's not sugarcoat it. While KeyboardAvoidingView is a good starting point, the React Native community has a bit of a love-hate relationship with it. As one developer bluntly put it, "React Native's own KeyboardAvoidingView can't avoid the keyboard in this very simple situation... Maybe they should call it the KeyboardSometimesMaybeAvoidingIfItFeelsLikeItView?".
It can struggle with complex layouts, behave inconsistently across iOS and Android, and fail entirely inside modals or bottom sheets. So, what are your options when the built-in component lets you down?
1. The "Keyboard-Aware" Library
A very popular alternative is the react-native-keyboard-aware-scroll-view library. Instead of just moving the view, it makes your ScrollView "aware" of the keyboard. When an input is focused, it automatically scrolls to that specific input, ensuring it's perfectly positioned above the keyboard. This is often more reliable for long forms with many fields.
2. The Native Module Power-Up
For the most consistent and smooth experience, especially in complex scenarios (modals, bottom sheets, chats), you might need a native solution. Libraries like react-native-keyboard-controller or react-native-avoid-softinput use native code under the hood to handle keyboard animations and interactions. They promise the same smooth, predictable behavior you see in native iOS and Android apps, fixing the inconsistencies of the JS-based KeyboardAvoidingView.
3. The Custom "Avoider" Solution
Some developers, frustrated with the existing tools, have built their own improved versions. Packages like @good-react-native/keyboard-avoider aim to create a component that "just works" in every layout by using different calculation methods and transforms. These can be great options if you're hitting a wall with other libraries.
Best Practices to Keep Your Sanity
Test, Test, and Test Again: This is non-negotiable. Check your screens on multiple iPhone and Android device sizes (and simulators). Tap every input field in different orders.
Combine with
ScrollView: For forms with more than a couple of inputs, always wrap your content in aScrollView(orKeyboardAwareScrollView) inside theKeyboardAvoidingView. This guarantees users can access all fields, even on small screens.Handle the Keyboard Dismissal: Use
keyboardShouldPersistTaps='handled'on yourScrollViewto allow taps outside the keyboard to dismiss it properly.Mind the Android Manifest: On Android, you can influence system-level keyboard behavior via the
android:windowSoftInputModeattribute in yourAndroidManifest.xml. Values likeadjustResizeoradjustPancan change how your app's window reacts. Sometimes, letting React Native handle it (by not setting this) is best, but you may need to experiment.For Bottom Tabs & Modals: Be extra careful. You may need to hide bottom tab bars when the keyboard opens (
tabBarHideOnKeyboard) or use specialized native libraries to handle inputs inside modals correctly.
Frequently Asked Questions (FAQs)
Q: Why is my input still getting covered even with KeyboardAvoidingView?
A: The most common culprits are missing keyboardVerticalOffset (for headers) or using the wrong behavior prop for your specific layout. Try switching between padding and position, and double-check your offset value.
Q: Should I use the same behavior prop for iOS and Android?
A: Usually not. It's standard practice to use Platform.select to set behavior='padding' for iOS and behavior='height' (or undefined) for Android.
Q: Is KeyboardAvoidingView the best solution for a chat screen?
A: For a chat interface where you have a message list and an input bar at the bottom, KeyboardAvoidingView with behavior='padding' can work. However, for the smoothest, most performant experience that matches native messaging apps, a dedicated native library like react-native-keyboard-controller is often the superior choice.
Q: My keyboard handling works in development but seems buggy in production. Why?
A: This can happen! Thoroughly test on a real device, not just a simulator. Also, ensure any native configuration (like Android manifest settings) is correctly applied in your production build.
Mastering these mobile-specific challenges is a key part of becoming a job-ready developer. At codercrafter.in, our project-based curriculum in Python Programming, Full Stack Development, and the MERN Stack forces you to solve real problems like these, building the kind of robust, user-friendly applications that employers demand.
Conclusion: Choose the Right Tool for the Job
KeyboardAvoidingView is a helpful built-in tool that can solve basic keyboard overlap issues. Start with it, understand its props (behavior, keyboardVerticalOffset), and use it for simpler screens.
But when you're building professional, polished applications—especially with complex layouts, modals, or bottom sheets—be prepared to reach for more powerful tools. Libraries like react-native-keyboard-aware-scroll-view or native modules like react-native-keyboard-controller exist because the community has identified the gaps in the core component. Don't be afraid to use them.
Ultimately, the goal is invisible. The best keyboard handling is the kind the user never notices. They tap, they type, they submit—all without ever fighting the interface. By understanding and correctly implementing these techniques, you move from just making an app work to crafting an exceptional user experience.


