Image Uploads to Server: A No-BS Developer's Guide (2025)
Learn how to upload images to a server like a pro. Step-by-step guide with code, best practices for security & speed, and real-world use cases. Master full-stack development.
The Ultimate Guide to Uploading Images to a Server: From Code to Cloud
Alright, let's be real. We live in a world driven by visuals. Your Instagram feed, the memes you share, the product photos on your favorite shopping app—they all have one thing in common: at some point, someone had to upload them to a server. If you're a developer, or even just dipping your toes into web stuff, knowing how to handle image uploads isn't just a skill; it's a superpower. And it can be confusing as heck.
So, whether you're building the next big social platform, adding a profile picture feature to your project, or just curious about what happens when you hit "post," this guide is for you. We're breaking it down, step-by-step, in plain language. No jargon-filled nonsense.
What Does "Uploading an Image to a Server" Even Mean?
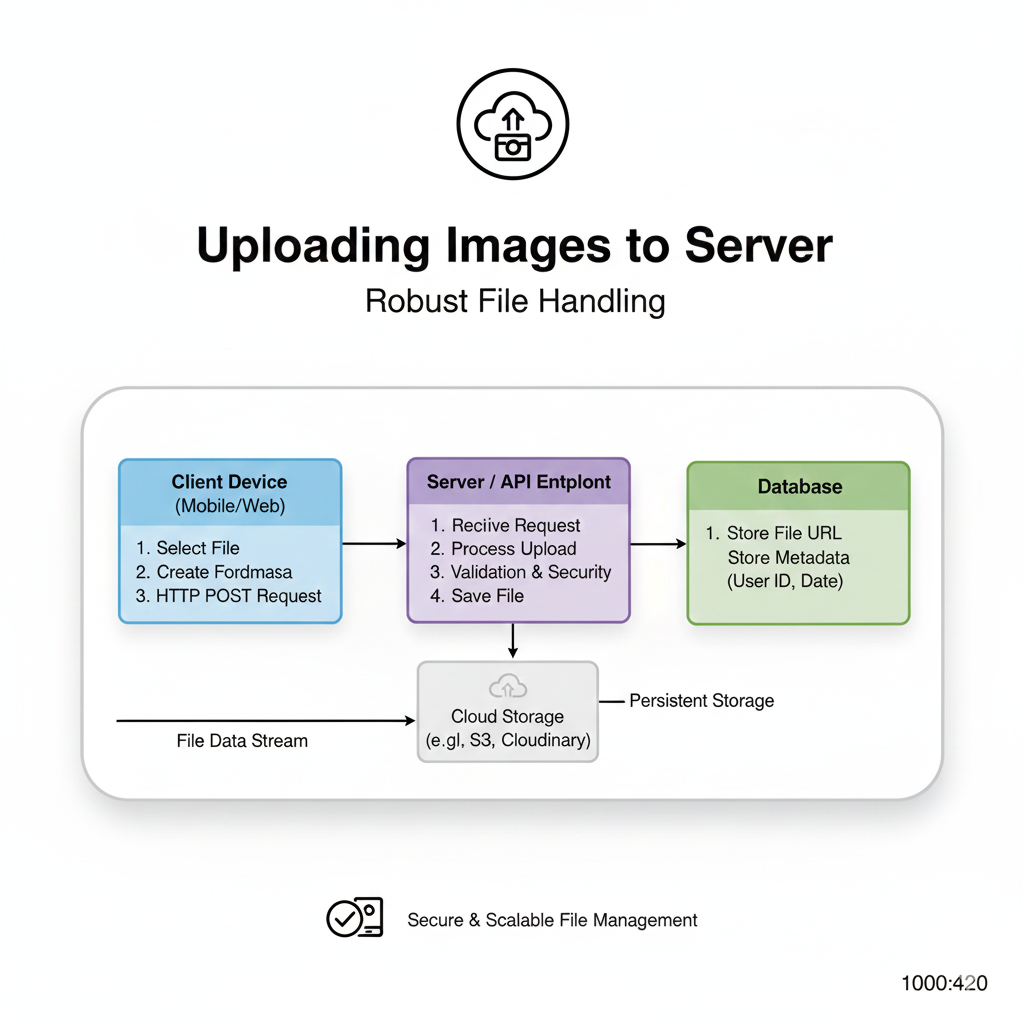
In the simplest terms, it's the process of taking an image file from a user's device (your phone, your laptop) and transferring a copy of it to a remote computer (a server) that's always connected to the internet. This server then stores it and makes it accessible via a unique URL. That URL is what you see embedded in websites (<img src="https://yourserver.com/yourcoolpic.jpg">).
Think of it like digital shipping. Your device is the local warehouse, the internet is the highway, and the server is the giant Amazon fulfillment center. The "package" is your image file.
Why Can't We Just Store Images Locally?
Great question. If you're building a website that runs on your computer only, you can! But the moment you want anyone else in the world to see their images on their devices, you need a central, always-available location. That's the server. It ensures consistency, reliability, and scalability.
The Nuts and Bolts: How It Actually Works
Let's walk through the standard flow. We'll use a classic "profile picture upload" as our example.
1. The Frontend: The User's View (HTML & JavaScript)
This is the part the user interacts with. You need an <input type="file"> element. That's the boring-looking button that opens your file explorer.
html
<form id="uploadForm">
    <label for="avatar">Choose a fire profile pic:</label>
    <input type="file" id="avatar" name="avatar" accept="image/png, image/jpeg, image/webp">
    <button type="submit">Upload and Level Up!</button>
</form>
<div id="preview"></div>
The accept attribute is a UX win—it filters the file selector to only show images.
Most modern apps show a preview before uploading. You'd use JavaScript for that:
javascript
const input = document.getElementById('avatar');
const preview = document.getElementById('preview');

input.addEventListener('change', () => {
    const file = input.files[0];
    if (file) {
        const img = document.createElement('img');
        img.src = URL.createObjectURL(file); // Creates a temporary local URL
        img.style.maxWidth = '200px';
        preview.innerHTML = ''; // Clear previous preview
        preview.appendChild(img);
    }
});
2. The Journey: Sending the Data (FormData API)
When the user hits submit, we need to package the file. We use the FormData API. It's like creating a digital envelope that the browser understands is for files.
javascript
const form = document.getElementById('uploadForm');
form.addEventListener('submit', async (event) => {
    event.preventDefault(); // Stop the page from reloading (old-school style)

    const formData = new FormData();
    const fileField = document.querySelector('input[type="file"]');
    formData.append('avatar', fileField.files[0]);
    // You can append other data too, like user ID
    formData.append('userId', '12345');

    // Send it off!
    try {
        const response = await fetch('https://your-server.com/upload', {
            method: 'POST',
            body: formData // Headers are set automatically by the browser for FormData!
        });
        const result = await response.json();
        console.log('Success!', result);
    } catch (error) {
        console.error('Oops!', error);
    }
});
3. The Backend: The Server's Job (Node.js/Express Example)
This is where the server receives the "envelope." You need a library to handle the incoming multipart form data (that's the fancy term for file uploads). The go-to is multer for Node.js.
javascript
const express = require('express');
const multer = require('multer');
const path = require('path');

const app = express();

// Configure where to store files and what to name them
const storage = multer.diskStorage({
    destination: function (req, file, cb) {
        cb(null, 'uploads/') // Make sure this folder exists!
    },
    filename: function (req, file, cb) {
        // Create a unique filename to prevent overwrites
        const uniqueSuffix = Date.now() + '-' + Math.round(Math.random() * 1E9);
        cb(null, file.fieldname + '-' + uniqueSuffix + path.extname(file.originalname));
    }
});

const upload = multer({ storage: storage });

// The crucial route that handles the POST request
app.post('/upload', upload.single('avatar'), (req, res) => {
    // 'avatar' must match the `name` attribute from the frontend
    // File info is now in `req.file`
    const fileUrl = `https://your-server.com/uploads/${req.file.filename}`;

    // You'd typically save this `fileUrl` to a database linked to the user
    res.json({
        message: 'File uploaded successfully!',
        url: fileUrl
    });
});

app.listen(3000, () => console.log('Server running...'));
Leveling Up: Real-World Best Practices
The basic code works, but for a production app, you need to think bigger.
Validation, Validation, Validation: Never trust user input. Check file type (by MIME type, not just extension), enforce size limits (e.g., max 5MB), and scan for malware if you're dealing at scale.
Use Cloud Storage: Storing files directly on your server (
uploads/folder) is okay for tiny projects. For real applications, use a cloud service like AWS S3, Google Cloud Storage, or Cloudinary. They handle scaling, backups, global delivery (CDN), and are way more secure and reliable. Your server becomes a traffic director, just generating secure upload URLs and processing metadata.Process Images: Resize images on the fly! Don't store a 4000x4000 pixel profile pic that gets displayed as 100x100. Use libraries like
sharpin Node.js or dedicated image CDNs to create multiple versions (thumbnail, medium, large).Security is Key:
Sanitize Filnames: A file named
../../../etc/passwdis bad news. Strip out special characters.Use Secure URLs: Cloud storage URLs should be signed (temporary) for private files.
HTTPS Everywhere: Non-negotiable.
Your FAQs, Answered
Q: What image formats should I accept?
A: Stick to .jpg (for photos), .png (for transparency), and .webp (modern, smaller size). Consider .avif for cutting-edge projects.
Q: My uploads are slow! How do I fix it?
A: 1) Compress images on the frontend before sending (libraries like browser-image-compression). 2) Implement progress indicators using the Fetch API's UploadProgress event. 3) Use a cloud storage region closest to your users.
Q: Can I upload directly from the frontend to cloud storage?
A: Yes, and you often should! Your server can generate a pre-signed URL (AWS S3) or upload parameters (Cloudinary) that allow the frontend to upload directly to the cloud. This is faster and reduces load on your server.
Q: What about databases? Where does the image go?
A: The database only stores the URL string (e.g., "https://my-bucket.s3.amazonaws.com/users/123-avatar.jpg"). The actual file lives in your cloud storage bucket or server folder.
Wrapping It Up: From Upload to Impact
Mastering image uploads is a gateway skill. It teaches you about full-stack workflow: frontend interaction, network communication, server-side processing, security, and cloud services. It's a practical milestone in your dev journey.
Feeling inspired to build the next Instagram or just a killer portfolio project with seamless uploads? This is where the foundation is laid.
Ready to move beyond tutorials and build production-ready applications? To learn professional software development courses that dive deep into backend systems, cloud integration, and full-stack architecture like Python Programming, Full Stack Development, and the MERN Stack, visit and enroll today at codercrafter.in. We'll help you turn concepts like these into professional-grade skills.
So go ahead, implement that upload feature. Test it, break it, secure it. And the next time you post a pic, you'll appreciate the incredible journey that humble file takes from your device to the world.


