Build a CRUD App with React Native & Node.js: The Ultimate Guide for Beginners
Step-by-step tutorial to build a fully functional CRUD mobile app using React Native (frontend) and Node.js (backend). Learn setup, coding, best practices, and deploy your project. Perfect for beginners.
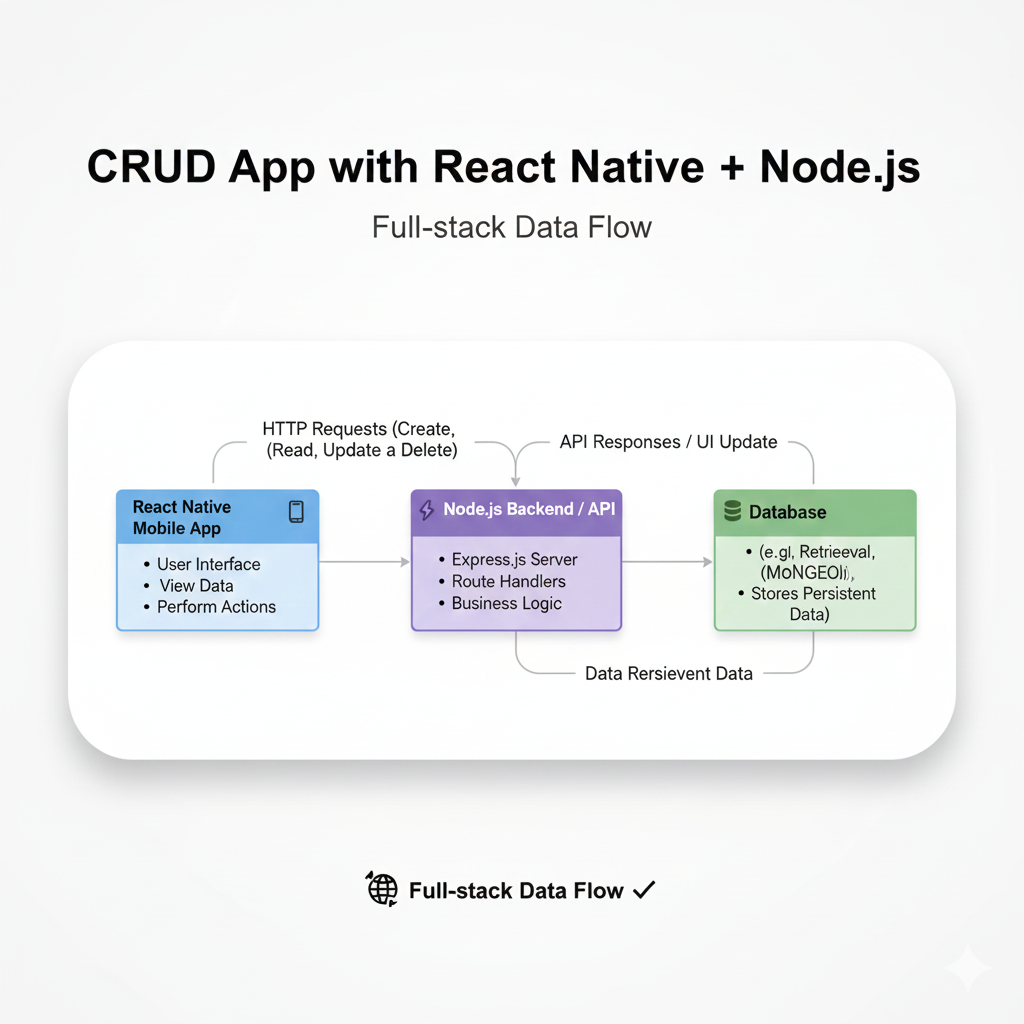
Alright, let's cut to the chase. You want to build something real. Not just another to-do app that sits on your laptop, but an actual mobile application that can Create, Read, Update, and Delete data—a CRUD app—with its own backend. That’s the golden ticket to calling yourself a full-stack mobile developer.
And guess what? The combo of React Native for the slick mobile frontend and Node.js for the robust backend is literally the dream team for this. It’s what powers thousands of apps out there. Today, we’re not just talking about it; we’re building it. Buckle up.
What’s This CRUD Buzz, Anyway?
In the simplest terms, CRUD is the blueprint for most apps you use daily. Every time you post on Instagram (Create), scroll through your feed (Read), edit a tweet (Update), or ditch a message (Delete), you’re witnessing CRUD in action.
C - Create: Adding new data (POST request).
R - Read: Fetching or viewing data (GET request).
U - Update: Modifying existing data (PUT/PATCH request).
D - Delete: Removing data (DELETE request).
It’s the fundamental cycle of persistent data management. Our mission? To build this cycle ourselves.
Why React Native + Node.js? The Power Duo
React Native: Write your mobile app in JavaScript/React, and it runs on both iOS and Android. One codebase, two platforms. It’s a game-changer for speed and efficiency. The UI is native, so it doesn’t feel like a clunky web view.
Node.js: A JavaScript runtime for the server. Using a framework like Express.js, you can whip up a powerful API in minutes. The best part? You’re using JavaScript on both ends (the MERN/MEAN stack vibe), which means context-switching is minimal.
Together, they form a seamless, JavaScript-centric development pipeline.
Let’s Build: The Backend (Node.js + Express)
Think of this as building the engine and the rules of the game.
1. Project Setup
bash
mkdir my-app-backend
cd my-app-backend
npm init -y
npm install express mongoose cors dotenv
We’re using mongoose to talk to MongoDB (a NoSQL database), cors to allow our mobile app to call the API, and dotenv for environment variables.
2. The Server (server.js)
javascript
const express = require('express');
const mongoose = require('mongoose');
const cors = require('cors');
require('dotenv').config();

const app = express();
const PORT = process.env.PORT || 5000;

// Middleware
app.use(cors());
app.use(express.json()); // Allows us to parse JSON

// Connect to MongoDB (Use your own URI, never commit this!)
mongoose.connect(process.env.MONGO_URI)
  .then(() => console.log('MongoDB Connected!'))
  .catch(err => console.log(err));

// Define a Schema and Model (Let's say for a "Task")
const TaskSchema = new mongoose.Schema({
  title: String,
  description: String,
  isCompleted: Boolean,
});
const Task = mongoose.model('Task', TaskSchema);

// ---------- CRUD ROUTES ---------- //

// CREATE
app.post('/tasks', async (req, res) => {
  try {
    const newTask = new Task(req.body);
    const savedTask = await newTask.save();
    res.status(201).json(savedTask);
  } catch (error) {
    res.status(500).json({ error: error.message });
  }
});

// READ (All)
app.get('/tasks', async (req, res) => {
  const tasks = await Task.find();
  res.json(tasks);
});

// READ (One)
app.get('/tasks/:id', async (req, res) => {
  const task = await Task.findById(req.params.id);
  res.json(task);
});

// UPDATE
app.put('/tasks/:id', async (req, res) => {
  const updatedTask = await Task.findByIdAndUpdate(req.params.id, req.body, { new: true });
  res.json(updatedTask);
});

// DELETE
app.delete('/tasks/:id', async (req, res) => {
  await Task.findByIdAndDelete(req.params.id);
  res.json({ message: 'Task deleted successfully' });
});

// Start the server
app.listen(PORT, () => console.log(`Server running on port ${PORT}`));
Boom! You just built a fully functional API. Test it with Postman or Thunder Client before moving on. This is the bedrock.
Let’s Build: The Mobile Frontend (React Native)
Now for the part users will actually see and touch.
1. Initialize the App
bash
npx react-native init MyMobileApp
cd MyMobileApp
We’ll use the built-in Fetch API for HTTP calls and React Hooks for state management. Let’s also install a navigation library and a UI kit for speed.
bash
npm install @react-navigation/native @react-navigation/stack react-native-screens react-native-safe-area-context
npm install react-native-paper axios
axios is a nicer alternative to fetch for API calls.
2. The Main App Screen (App.js)
This is a simplified version focusing on the core CRUD logic.
javascript
import React, { useState, useEffect } from 'react';
import { SafeAreaView, FlatList, Alert, StyleSheet } from 'react-native';
import { Button, Card, TextInput, FAB } from 'react-native-paper';
import axios from 'axios';

const API_URL = 'http://YOUR_LOCAL_IP:5000/tasks'; // Replace with your backend IP

const App = () => {
  const [tasks, setTasks] = useState([]);
  const [title, setTitle] = useState('');
  const [description, setDescription] = useState('');
  const [editingId, setEditingId] = useState(null);

  // READ: Fetch all tasks on load
  useEffect(() => {
    fetchTasks();
  }, []);

  const fetchTasks = async () => {
    try {
      const { data } = await axios.get(API_URL);
      setTasks(data);
    } catch (error) {
      Alert.alert('Error', 'Failed to fetch tasks');
    }
  };

  // CREATE or UPDATE
  const saveTask = async () => {
    if (!title.trim()) return;
    try {
      if (editingId) {
        // Update
        await axios.put(`${API_URL}/${editingId}`, { title, description });
        setEditingId(null);
      } else {
        // Create
        await axios.post(API_URL, { title, description, isCompleted: false });
      }
      setTitle('');
      setDescription('');
      fetchTasks(); // Refresh the list
    } catch (error) {
      Alert.alert('Error', 'Something went wrong!');
    }
  };

  // DELETE
  const deleteTask = (id) => {
    Alert.alert('Delete Task', 'Are you sure?', [
      { text: 'Cancel', style: 'cancel' },
      {
        text: 'Delete',
        onPress: async () => {
          await axios.delete(`${API_URL}/${id}`);
          fetchTasks();
        },
      },
    ]);
  };

  // Set task for editing
  const editTask = (task) => {
    setTitle(task.title);
    setDescription(task.description);
    setEditingId(task._id);
  };

  const renderItem = ({ item }) => (
    <Card style={styles.card} onPress={() => editTask(item)}>
      <Card.Title title={item.title} subtitle={item.description} />
      <Card.Actions>
        <Button onPress={() => editTask(item)}>Edit</Button>
        <Button onPress={() => deleteTask(item._id)}>Delete</Button>
      </Card.Actions>
    </Card>
  );

  return (
    <SafeAreaView style={styles.container}>
      <TextInput label="Task Title" value={title} onChangeText={setTitle} style={styles.input} />
      <TextInput label="Description" value={description} onChangeText={setDescription} style={styles.input} />
      <Button mode="contained" onPress={saveTask} style={styles.button}>
        {editingId ? 'Update Task' : 'Add Task'}
      </Button>

      <FlatList data={tasks} renderItem={renderItem} keyExtractor={(item) => item._id} />

      <FAB icon="refresh" style={styles.fab} onPress={fetchTasks} />
    </SafeAreaView>
  );
};

const styles = StyleSheet.create({
  container: { flex: 1, padding: 16 },
  input: { marginBottom: 10 },
  button: { marginBottom: 20 },
  card: { marginBottom: 10 },
  fab: { position: 'absolute', margin: 16, right: 0, bottom: 0 },
});

export default App;
Pro-Tip: To connect your physical phone or emulator to your local backend, replace localhost in the API_URL with your machine’s local IP address (e.g., 192.168.1.5). This is a classic rookie hurdle!
Real-World Use Cases & Why This Matters
This isn’t just an academic exercise. The pattern you just built is the skeleton for:
E-commerce Apps: Products in a cart are CRUD operations.
Social Media Apps: Posts, comments, likes—all CRUD.
Fitness Trackers: Logging workouts, updating progress.
Business Tools: Managing clients, invoices, projects.
Mastering this flow means you can conceptualize and build the core of most application ideas.
Best Practices to Level Up Your App
State Management: For larger apps, ditch
useStatefor Context API, Zustand, or Redux Toolkit.API Layer: Don’t scatter
axioscalls everywhere. Create a dedicatedapi.jsservice file.Error Handling: Implement proper toast messages or snackbars for user feedback.
Security: Never hardcode API keys. Use environment variables (
react-native-config). In production, add JWT authentication to your backend routes.UI/UX: Use consistent components from libraries like NativeBase or Paper (as we did). Spacing, fonts, and feedback matter.
FAQs: Stuff You Might Be Wondering
Q: Can I use a SQL database instead of MongoDB?
A: Absolutely! Swap out mongoose for an ORM like Sequelize (for PostgreSQL, MySQL) or use the Prisma client. The Node.js logic remains similar.
Q: How do I deploy this to the App Store/Play Store?
A: 1) Deploy your Node.js backend to a cloud service (Render, AWS, DigitalOcean). 2) Generate production builds of your React Native app using EAS Build or the classic CLI process, then submit to the stores.
Q: Is React Native performance good enough?
A: For most consumer apps, 100%. For graphics-intensive apps (like games), you might hit limits. For everything else—social, productivity, e-commerce—it’s perfect.
Q: I’m stuck with connection errors between my app and backend. Help!
A: This is the #1 beginner issue. Ensure your backend server is running, your IP/port is correct, and you’ve handled CORS on the backend. Always check the terminal/console logs!
Conclusion: You’ve Just Crossed a Major Threshold
Look at what you’ve accomplished. You’ve built a data model in Node.js, created a RESTful API with Express, and connected it to a cross-platform mobile app with React Native. This is the essence of full-stack development. You’re no longer just a frontend or a backend developer—you’re the architect who can connect both worlds.
The next steps? Add user authentication, image uploads, push notifications, and deploy it. Each feature is a new learning module.
Ready to transform from a tutorial follower to a professional, job-ready developer? This project is just the beginning. To master these concepts in a structured, industry-aligned curriculum with mentorship and real-world projects, explore professional software development courses such as Python Programming, Full Stack Development, and the MERN Stack. Visit and enroll today at codercrafter.in. Build your portfolio, build your confidence, and build your career.
Now go ahead, customize this app. Change the data model to a "Booklist," "Expense Tracker," or "Movie Watchlist." Make it yours. The code is yours. The foundation is set.


