AWS Amplify + React Native: Your Complete Guide to Full-Stack Mobile Dev in 2025
Supercharge your React Native apps with AWS Amplify. Learn setup, auth, data, storage, real-world use, and best practices. Build faster, scale smarter. Enroll in professional courses at CoderCrafter.
AWS Amplify + React Native: Ditch the Backend Headache and Build Scalable Apps Faster
Let’s be real. As a React Native developer, you love crafting beautiful, cross-platform UIs. But the moment you need to add user sign-ups, a real database, file storage, or an API, the vibe shifts. Suddenly, you’re wrestling with servers, DevOps, and endless configuration files. Your passion project starts feeling like a chore.
What if you could just… not do all that?
What if you could plug in a fully-managed, scalable backend into your React Native app like it’s a component library? That’s the promise of AWS Amplify. And trust me, it’s not just hype. In this deep dive, we’re going to strip away the jargon and build a practical understanding of how Amplify can turn you into a full-stack mobile dev ninja, without the infrastructure nightmares.
What Exactly is AWS Amplify? (No Corporate Jargon, I Promise)
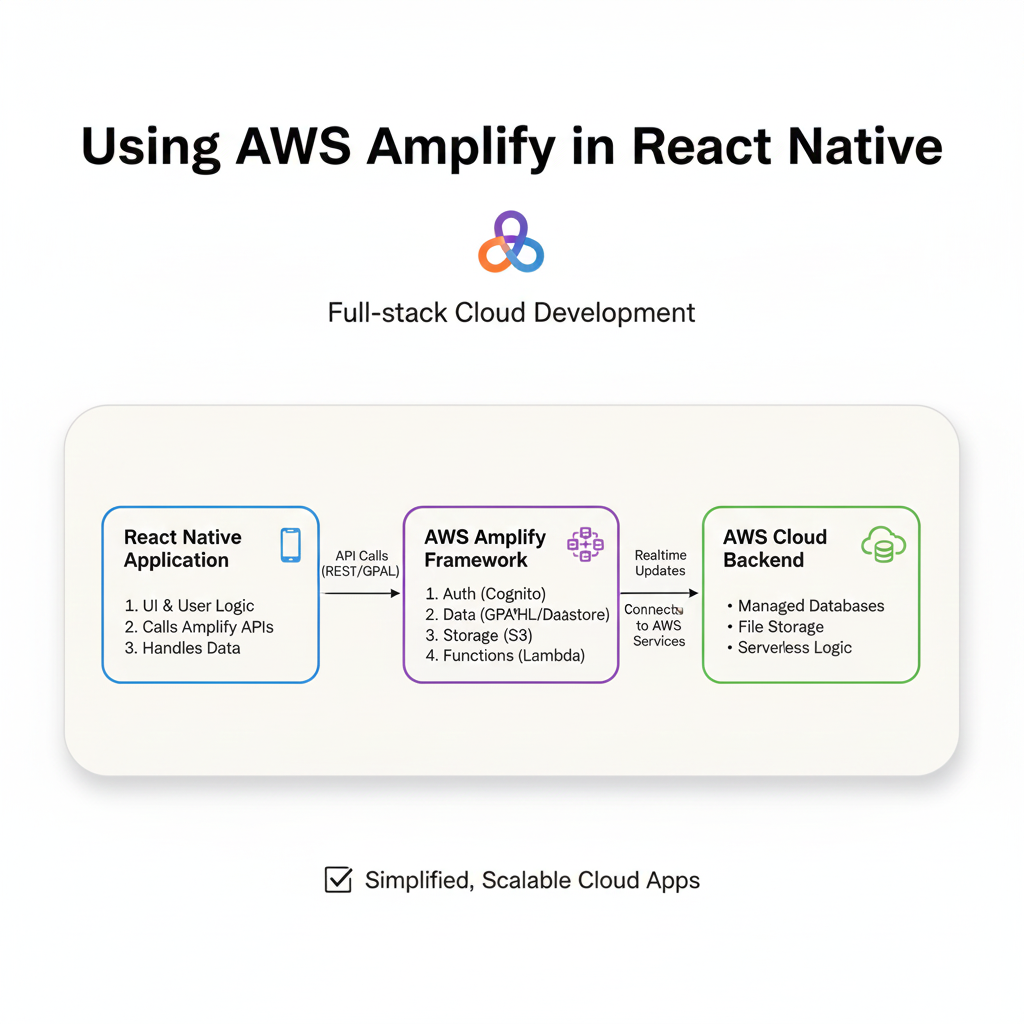
Think of AWS Amplify as your ultimate dev wingman for the cloud. It’s not a single service, but a suite of tools and services from Amazon Web Services (AWS) designed specifically for frontend and mobile developers.
The core idea is simple: It lets you configure and connect your React Native app to powerful AWS cloud services using mostly just your frontend code. It provides:
A CLI (Command Line Interface): To set up and manage your backend services (like creating a database table) from your terminal.
Libraries: To connect your React Native app to those services (like fetching data or uploading an image).
A Hosting Service: To deploy your app and its connected backend with a few commands.
In essence, Amplify is the bridge. You stay in your React Native comfort zone, and it handles the heavy lifting on AWS, provisioning things like Amazon Cognito for auth, AWS AppSync (GraphQL) or Amazon DynamoDB for data, and Amazon S3 for storage.
Why Should You, a React Native Dev, Even Care?
Because time is your most valuable asset. Amplify dramatically reduces the “concept-to-ship” time for full-stack features.
It’s Declarative: You define what you need (“I need a user pool for sign-in” or “I need a photos table”), and the CLI generates the necessary cloud infrastructure.
It’s Integrated: The client libraries are designed for frameworks like React Native. Managing async state for auth or data fetching becomes significantly cleaner.
It Scales (Because It’s AWS): Your hobby project that gets sudden TikTok fame won’t crumble. It’s built on the same infrastructure Netflix uses.
The Local Development Flow is Killer: You can develop and test cloud features locally before pushing anything live.
Hands-On: Building a “Social Notes” App Feature
Let’s get our hands dirty. We’ll build a core slice of a social notes app: User sign-up, secure note creation, and image uploads.
Step 1: Setting Up the Foundation
First, make sure you have Node.js, npm/yarn, and the React Native CLI set up. Then, the Amplify initiation:
bash
# 1. Install the Amplify CLI globally
npm install -g @aws-amplify/cli

# 2. Configure it with your AWS account (follow the prompts)
amplify configure

# 3. Create your React Native app (if you haven't)
npx react-native init SocialNotesApp

# 4. Navigate into your project and initialize Amplify
cd SocialNotesApp
amplify init
The init command is magical. It asks about your app name, environment, and sets up a local amplify/ directory that holds your backend definition. It also creates a cloud project on the AWS Amplify Console.
Step 2: Adding Authentication in 10 Minutes
We want users to sign up/sign in with email.
bash
amplify add authSelect the default configuration (email login). Now, deploy it:
bash
amplify pushBoom. A fully functional user authentication system is live on AWS Cognito.
In your React Native app, install the libraries:
bash
npm install aws-amplify @aws-amplify/ui-react-nativeWrap your root component (e.g., in App.js) with the Amplify provider and configure it:
javascript
// App.js
import { Amplify } from 'aws-amplify';
import awsconfig from './aws-exports'; // Generated by Amplify CLI
import { withAuthenticator } from '@aws-amplify/ui-react-native';

Amplify.configure(awsconfig);

function App() {
  return (
    // Your app screens
  );
}

// withAuthenticator HOC automatically adds sign-up/sign-in flows
export default withAuthenticator(App);
Just like that, your app now has a complete, styled auth flow. No building UI forms or auth logic from scratch.
Step 3: Creating a Secure Notes Database
Let’s add a GraphQL API for our notes.
bash
amplify add apiChoose “GraphQL”, name it, and use the guided schema. When prompted, use this simple schema:
graphql
type Note @model @auth(rules: [{ allow: owner }]) {
  id: ID!
  content: String!
  imageKey: String # We'll use this for the S3 image link
}
@model tells Amplify to create a DynamoDB table and all CRUD GraphQL operations. @auth makes each note readable/writable only by its owner. Push again (amplify push). It will generate all your GraphQL mutations and queries.
Now, in your screen, you can create a note:
javascript
import { API, graphqlOperation } from 'aws-amplify';
import { createNote } from '../graphql/mutations';

// Inside a function
await API.graphql(
  graphqlOperation(createNote, {
    input: { content: "My first secret note!" }
  })
);
Step 4: Adding Image Storage
Add storage for profile pics or note images:
bash
amplify add storageChoose “Content” and set auth permissions. Push (amplify push).
Uploading an image from the device becomes:
javascript
import { Storage } from 'aws-amplify';
import { launchImageLibrary } from 'react-native-image-picker';

// After picking an image
const result = await launchImageLibrary({ mediaType: 'photo' });
if (result.assets?.[0]) {
  const file = result.assets[0];
  // Upload to a user-specific folder
  const key = `${user.attributes.sub}/${Date.now()}-${file.fileName}`;
  await Storage.put(key, file, {
    contentType: file.type,
  });

  // Save the key to your Note's 'imageKey' field
  await API.graphql(
    graphqlOperation(createNote, {
      input: { content: "Note with pic!", imageKey: key }
    })
  );
}

// To display the image
const signedUrl = await Storage.get(key);
// Use signedUrl in an <Image> component
Real-World Use Cases: Where Amplify Shines
MVP & Startup Apps: Perfect for validating an idea. You’re building product features, not infrastructure.
Internal Enterprise Tools: Rapidly build secure, authenticated apps for field teams, HR, or logistics.
Social/Community Apps: Handles user-generated content (images, posts), real-time feeds (with Amplify PubSub), and user profiles seamlessly.
E-commerce Mobile Apps: Manage user accounts, product catalogs (via APIs), and image galleries.
The pattern is clear: if your app needs cloud-powered features with user-specific data, Amplify is a top-tier contender.
Best Practices to Avoid Future Headaches
Environment Segmentation: Use
amplify env addto create separatedev,staging, andprodenvironments. Never develop directly in production.Mind the Cost: While Amplify has a generous free tier, monitor your usage. DynamoDB read/writes and S3 storage can incur costs at scale. Use the AWS billing dashboard.
Don’t Put Logic in the Client: Use Amplify Functions (AWS Lambda) for sensitive operations like payment processing or data validation. Your React Native app should not be the gatekeeper.
Embrace the
amplify/Folder: Commit it to Git. It’s the source of truth for your backend. Your team can clone the repo and runamplify pullto get the same setup.Stay Updated: The Amplify team iterates fast. Keep your CLI and libraries updated, but read changelogs carefully.
FAQ Section
Q: I’m already using Firebase. Should I switch?
A: Not necessarily. Firebase is fantastic. Amplify’s strengths are its deep integration with the broader AWS ecosystem (if you need other AWS services) and its GraphQL-first approach with AppSync. It’s a matter of ecosystem preference.
Q: Does it lock me into AWS?
A: There is a vendor lock-in, yes. Your backend is defined and deployed as AWS services. However, your React Native client code remains largely portable.
Q: Can I use it with Expo?
A: Yes! With the Expo Config Plugin, it works seamlessly. The old “eject” requirement is gone.
Q: What about the learning curve?
A: If you know React Native and basic GraphQL, the initial curve is gentle. The deeper learning is about understanding the AWS services it provisions (Cognito, AppSync, IAM roles) for debugging and optimization.
Q: Is it production-ready?
A: Absolutely. Companies like Bird and Postman use it at scale.
Conclusion: Should You Jump In?
AWS Amplify isn’t a silver bullet for every project. If you need a simple static site or have highly specific, complex backend requirements, it might be overkill or require extra work.
But for the vast majority of React Native developers who want to build full-stack, data-driven, scalable applications without becoming certified DevOps engineers, Amplify is a game-changer. It turns months of backend work into days or weeks.
It allows you to focus on what makes your app unique—the user experience and the business logic—while handing off the undifferentiated heavy lifting to AWS. In a world where speed to market is everything, that’s a superpower.
The journey from a front-end coder to a full-stack app developer is filled with decisions, and choosing the right toolchain is half the battle. Tools like AWS Amplify are redefining what’s possible for small teams and indie developers.
Ready to transform from a React Native developer into a sought-after full-stack mobile expert? Understanding tools like AWS Amplify is a crucial part of the modern development stack. To learn professional software development courses such as Python Programming, Full Stack Development, and the MERN Stack, which give you the foundational and advanced skills to leverage platforms like Amplify effectively, visit and enroll today at codercrafter.in. At CoderCrafter, we don’t just teach syntax; we teach you how to build, deploy, and scale real-world applications.


