Stripe Payments in React Native: A 2025 Step-by-Step Guide
Learn to add Stripe payments to your React Native app in 2025. Covers setup, code examples, best practices, and secure payment flows for one-time & subscription payments.
Alright, let's get real for a second. You've built this killer React Native app. It looks slick, the UX is smooth, and people are actually downloading it. But there's one tiny problem… you can't actually make money from it yet. That "Premium" tier, those digital goodies, that subscription service—they're all stuck behind the dreaded "payment integration" wall.
If you've been Googling "how to add payments to React Native" and falling down a rabbit hole of confusing docs, outdated tutorials, and security nightmares, take a deep breath. You've landed in the right place. Today, we're breaking down exactly how to integrate Stripe—the payment giant powering millions of businesses—into your React Native app. No fluff, just actionable steps, real code, and the gotchas nobody tells you about.
So, What Even Is Stripe, and Why Should You Care?
In simple terms, Stripe is a toolkit for money. It's a suite of APIs that lets developers embed payments, subscriptions, and financial workflows directly into their apps and websites. Think of it as the plumbing for internet money. You handle the user experience; Stripe handles the scary, complex, and legally intense stuff like securely storing card numbers, complying with regulations (like PCI DSS), and actually moving money from your customer's bank to yours.
Why Stripe for React Native?
Developer-First: Their documentation is legendary. It's clear, has tons of examples, and their API design just makes sense.
Batteries-Included: Need subscriptions? One-time payments? International currencies? Saved cards? It's all there.
The React Native SDK is Officially Awesome: Gone are the days of shaky community packages. Stripe's official
@stripe/stripe-react-nativelibrary is mature, well-maintained, and packed with pre-built UI components that make your life infinitely easier.
Before You Write a Single Line of Code: The Mindset
Here's the most crucial concept: Your React Native app should NEVER, EVER directly handle sensitive card details. Never. Not in a useState hook, not in a Context, nowhere on the client.
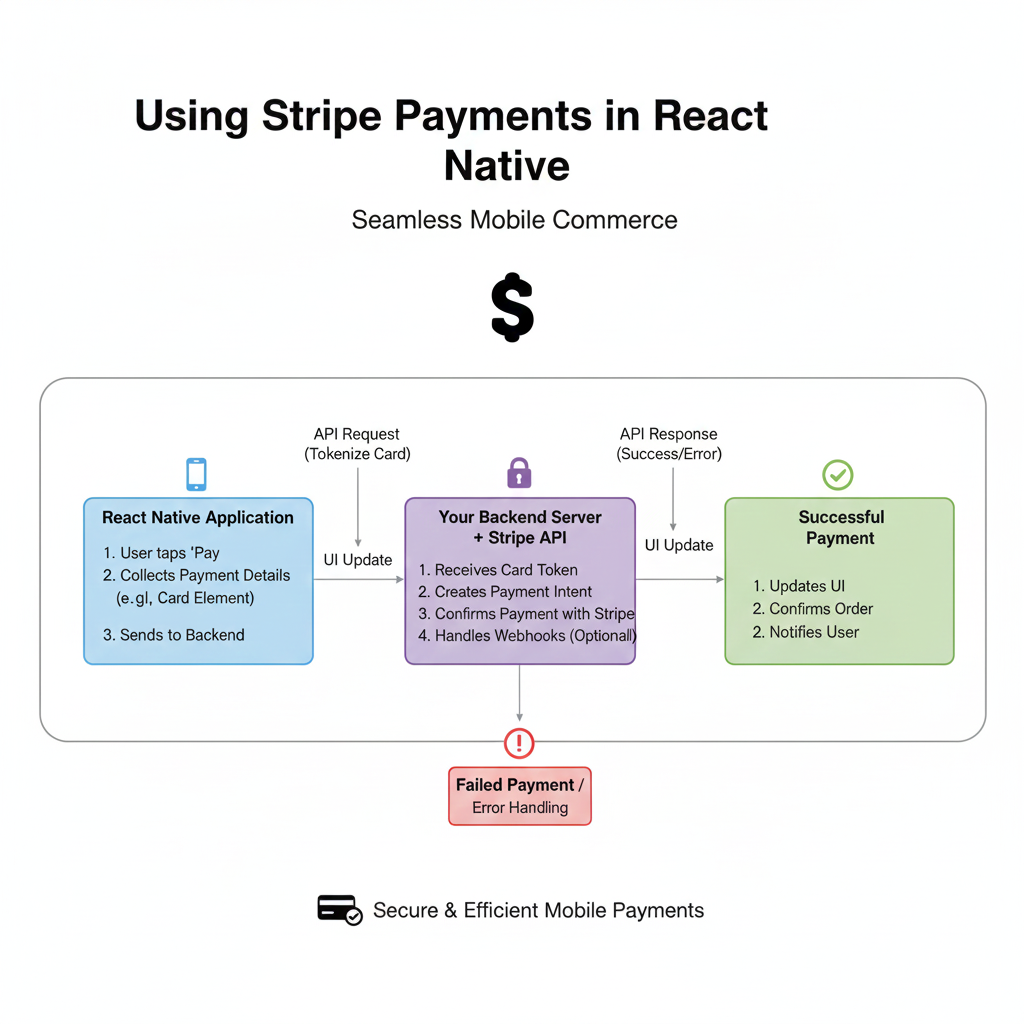
The golden flow is this:
Your app collects payment info using Stripe's secure, pre-built UI components.
Stripe's SDK tokenizes that info (turns it into a secret token called a
PaymentMethod).You send that token (not the card number!) to your own backend server.
Your server uses Stripe's secret API key to confirm the payment.
Your server tells your app if it was a success.
This keeps you PCI compliant and stops you from accidentally leaking your users' data. Got it? Cool. Let's build.
Hands-On: Building a "Pro Upgrade" Screen
Let's imagine we're adding a one-time $9.99 payment to unlock pro features. Here’s how it goes down, step-by-step.
Step 1: Set Up Your Stripe Account & Backend
Head to stripe.com and create an account. You'll get two crucial keys:
Publishable Key (pk_...): Safe to put in your React Native app. It identifies your Stripe account.
Secret Key (sk_...): THE MASTER KEY. This must only live on your backend server (like a Node.js/Express, Python/Django, or similar). If this leaks, someone can spend all your money.
You'll need a simple backend endpoint. Here's a super basic Node.js/Express example:
javascript
// In your backend server (e.g., server.js)
const express = require('express');
const Stripe = require('stripe');
const app = express();
const stripe = Stripe(process.env.STRIPE_SECRET_KEY); // Use env variables!

app.post('/create-payment-intent', async (req, res) => {
  try {
    const { amount, currency } = req.body;

    // Create a PaymentIntent on the server
    const paymentIntent = await stripe.paymentIntents.create({
      amount: amount, // e.g., 999 for $9.99
      currency: currency, // e.g., 'usd'
      // Optional: add metadata about the user or purchase
      metadata: { userId: 'user_123', feature: 'pro_upgrade' }
    });

    // Send the client secret back to the app
    res.json({ clientSecret: paymentIntent.client_secret });
  } catch (error) {
    res.status(500).json({ error: error.message });
  }
});

app.listen(4242, () => console.log('Server running on port 4242'));
Step 2: Wire Up Your React Native App
First, install the SDK in your app:
bash
cd your-react-native-project
npm install @stripe/stripe-react-native
# For iOS, don't forget to run:
cd ios && pod install
Now, let's create the payment screen. We'll use the PaymentSheet, which is Stripe's all-in-one, drop-in UI.
javascript
// ProUpgradeScreen.js
import React, { useState, useEffect } from 'react';
import { View, Button, Alert, Text, StyleSheet } from 'react-native';
import { StripeProvider, useStripe } from '@stripe/stripe-react-native';

// Your publishable key from the Stripe dashboard
const STRIPE_PUBLISHABLE_KEY = 'pk_test_your_key_here';
// Your backend endpoint
const BACKEND_URL = 'https://your-backend.herokuapp.com'; // Change this!

function PaymentScreenContent() {
  const { initPaymentSheet, presentPaymentSheet } = useStripe();
  const [loading, setLoading] = useState(false);
  const [paymentSheetEnabled, setPaymentSheetEnabled] = useState(false);

  // 1. Fetch the PaymentIntent and prepare the PaymentSheet
  const initializePaymentSheet = async () => {
    setLoading(true);

    // Call YOUR backend to create the PaymentIntent
    const response = await fetch(`${BACKEND_URL}/create-payment-intent`, {
      method: 'POST',
      headers: { 'Content-Type': 'application/json' },
      body: JSON.stringify({ amount: 999, currency: 'usd' }),
    });
    const { clientSecret } = await response.json();

    // 2. Initialize the PaymentSheet with the client secret
    const { error } = await initPaymentSheet({
      paymentIntentClientSecret: clientSecret,
      merchantDisplayName: 'Your App, Inc.',
      allowsDelayedPaymentMethods: false, // Set based on your business model
    });

    if (!error) {
      setPaymentSheetEnabled(true);
    } else {
      Alert.alert('Error', error.message);
    }
    setLoading(false);
  };

  // 3. Present the sheet to the user
  const openPaymentSheet = async () => {
    const { error } = await presentPaymentSheet();

    if (error) {
      Alert.alert(`Error code: ${error.code}`, error.message);
    } else {
      // 🎉 PAYMENT SUCCESS! 🎉
      Alert.alert('Success', 'Your order is confirmed!');
      // Here, you'd unlock the "pro" features for the user,
      // maybe by updating global state or calling your backend again.
      setPaymentSheetEnabled(false);
    }
  };

  useEffect(() => {
    initializePaymentSheet();
  }, []);

  return (
    <View style={styles.container}>
      <Text style={styles.title}>🚀 Unlock Pro Features</Text>
      <Text style={styles.subtitle}>Get advanced analytics, unlimited projects, and premium support for just $9.99.</Text>

      <Button
        title={loading ? "Loading..." : "Buy Now"}
        onPress={openPaymentSheet}
        disabled={!paymentSheetEnabled || loading}
        color="#635BFF" // Stripe's brand color, why not?
      />
    </View>
  );
}

// Wrap everything in the StripeProvider
export default function ProUpgradeScreen() {
  return (
    <StripeProvider publishableKey={STRIPE_PUBLISHABLE_KEY}>
      <PaymentScreenContent />
    </StripeProvider>
  );
}

const styles = StyleSheet.create({
  container: { flex: 1, justifyContent: 'center', padding: 20 },
  title: { fontSize: 28, fontWeight: 'bold', textAlign: 'center', marginBottom: 10 },
  subtitle: { fontSize: 16, textAlign: 'center', color: '#666', marginBottom: 40 },
});
Boom. That's it. You now have a fully functional, production-ready payment screen that handles cards, Apple Pay, and Google Pay out of the box.
Leveling Up: Real-World Considerations
1. Subscriptions: Instead of a one-time PaymentIntent, you'd create a Subscription with a Price on your backend. The flow is similar, but you'd manage the subscription lifecycle (cancel, upgrade, invoice) using Stripe's webhooks (little HTTP notifications Stripe sends to your backend).
2. Saving Cards for Later: Use the setupIntent API. This creates a PaymentMethod you can attach to a Customer object in Stripe and charge later without asking for the card again.
3. Testing is Your Best Friend: Stripe gives you a ton of test card numbers. Use 4242 4242 4242 4242 with any future expiry and CVC. Toggle your Stripe dashboard to "Test Mode" and go wild simulating successes, failures, and edge cases.
Best Practices & Common Gotchas
Handle Network Failures: What if the user's internet drops during payment? Implement retry logic and idempotency keys on your backend.
Never Trust the Client: Your backend must verify the payment was successful by checking the
PaymentIntentstatus on Stripe's API before granting access to the purchased item.Use Webhooks: Relying solely on your app's confirmation is risky. Set up webhook endpoints on your backend to listen for events like
payment_intent.succeededorinvoice.paid. This is the single source of truth.UI/UX Matters: The payment moment is high-anxiety for users. Use clear copy, show loading states, and give immediate, clear confirmation.
FAQ: Stuff You're Probably Wondering
Q: How much does Stripe cost?
A: It's pay-as-you-go. 2.9% + 30¢ per successful card charge in the US. No monthly fees. See their site for details.
Q: Can I use it for in-app purchases to avoid Apple's 30% cut?
A: NO. Apple's App Store guidelines are very clear. For digital goods and services used within an iOS app, you must use Apple's In-App Purchase (IAP) system. Stripe can be used for physical goods, services, or donations. Always check the latest platform rules!
Q: My backend is in Firebase/Google Cloud Functions/Python. Can I still use this?
A: Absolutely! The backend code above is just Node.js for illustration. Stripe has official libraries for Node, Python, Ruby, PHP, Java, Go, and more. The frontend flow remains identical.
Q: Is this secure for my users?
A: Yes, when implemented correctly as shown. The card details never touch your servers. They go directly from the user's device to Stripe's certified secure systems.
Wrapping Up
Integrating Stripe into React Native isn't just about adding a payment method—it's about unlocking the potential for your app to become a real business. The official SDK has turned what was once a multi-day integration into an afternoon's work.
Remember, start simple. Get a one-time payment working, understand the flow between your app and backend, and then explore more complex features like subscriptions and saved cards.
Feeling inspired but want to go deeper? To learn professional software development courses that cover real-world integrations like Stripe, along with Python Programming, Full Stack Development, and the MERN Stack, visit and enroll today at codercrafter.in. We build projects, not just theories.
Now go forth and monetize! And if you get stuck, the Stripe documentation and community forums are genuinely helpful. Happy (and profitable) coding! ✨


