Clean Architecture in React Native: Build Scalable & Maintainable Apps
Tired of messy React Native code? Master Clean Architecture! Our in-depth guide explains how to structure your app for scalability, testability, and long-term success. Level up your skills with CoderCrafter's professional courses.
Let's be real for a second. How many of us have started a React Native project with the best intentions, only to end up, a few months down the line, with a codebase that feels like a bowl of spaghetti?
You know the one. The component that does everything: it fetches data, handles business logic, manages state, and styles the UI. You need to change one tiny thing, and three other unrelated features break. Testing? Forget about it. Adding a new dev to the team? Be prepared for weeks of "How does this even work?"
If this hits home, you're not alone. This is where Clean Architecture comes in. It's not just another fancy buzzword; it's a practical, life-saving methodology for structuring your code so that your app remains scalable, testable, and maintainable as it grows.
In this deep dive, we're going to break down Clean Architecture for React Native, moving from textbook definitions to a real, working example you can apply to your next project.
So, What Exactly is Clean Architecture?
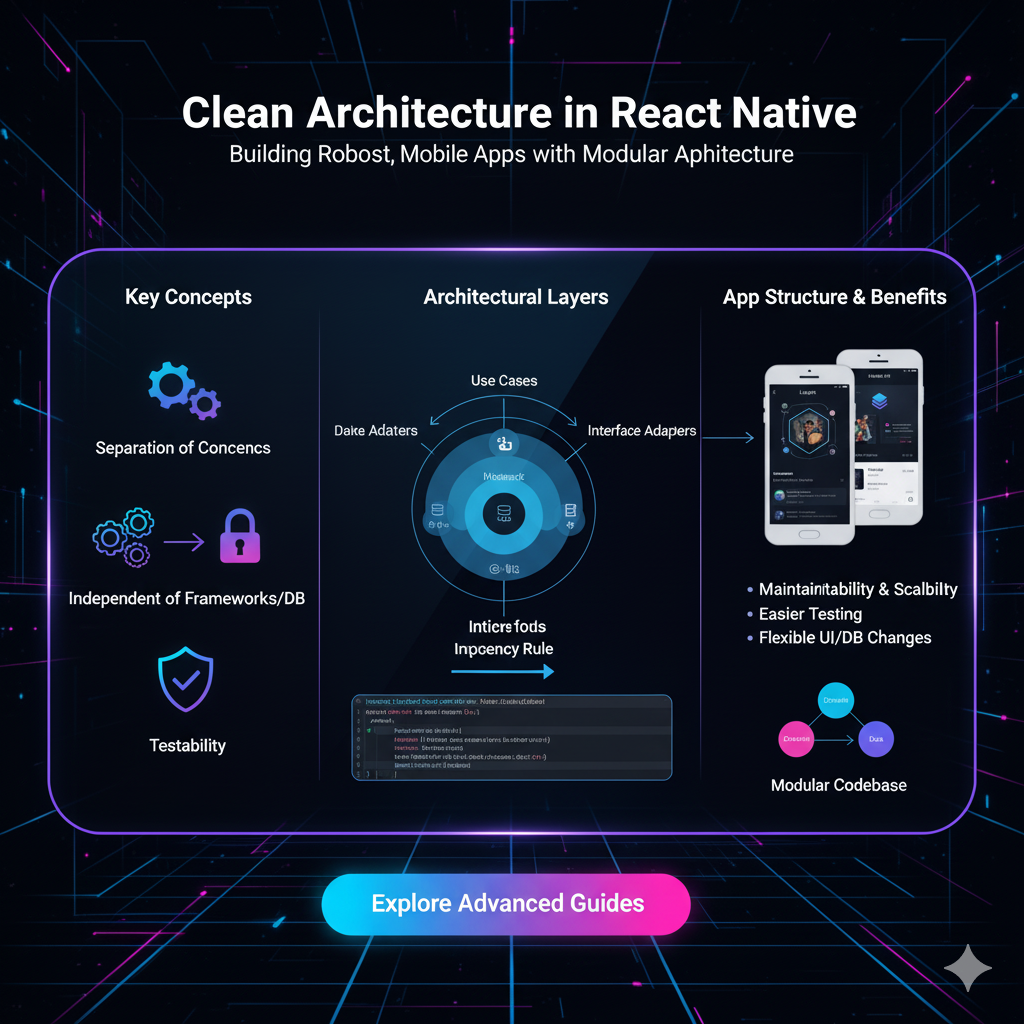
Coined by the legendary Uncle Bob (Robert C. Martin), Clean Architecture is a design philosophy that pushes for a separation of concerns. The core idea is to organize your code into concentric layers, each with a very specific and single responsibility.
Think of it like building a modern, high-tech building.
The outer shell (UI) can change—maybe you add new windows or a fresh coat of paint.
The plumbing and wiring (Infrastructure) might get upgraded.
But the core foundation and structural beams (Business Logic) remain rock-solid and untouched.
This independence is the superpower of Clean Architecture. Your business rules don't care if you're using React Native, Flutter, or plain JavaScript. They don't care if your data comes from a REST API, GraphQL, or local storage.
The Layers of Clean Architecture
In a React Native context, we can simplify it into three main layers:
Domain Layer (The Brain): This is the innermost circle, the heart of your application. It contains your Entities (plain JavaScript objects representing your core data, like a
Useror aProduct) and Use Cases (or Application Business Rules). Use Cases orchestrate the flow of data to and from the entities. They are pure logic, with zero dependencies on any external framework or library.Data Layer (The Fetcher): This layer is responsible for getting and storing data. It implements the interfaces (or contracts) defined by the Domain layer. Here you'll find your Repositories, which decide whether to fetch data from an API, a local database (like SQLite), or AsyncStorage. It also contains Data Models (which might be different from your Domain Entities) and the actual API calls.
Presentation Layer (The Face): This is the outer layer that the user interacts with. It contains your React Native UI Components (Screens, Buttons, etc.) and State Management (like Context, Redux, Zustand, or even just
useState/useEffect). This layer depends on the Domain layer to execute use cases.
The golden rule? Dependencies point inwards. The Presentation Layer depends on the Domain Layer, but the Domain Layer knows nothing about the Presentation Layer. This is enforced using Dependency Inversion, often via abstractions (like TypeScript interfaces or abstract classes).
Let's Build Something Real: A "User Profile" App
Enough theory. Let's see how this works in a typical React Native scenario: fetching and displaying a user's profile.
1. Domain Layer
First, we define what our core entity looks like and what we want to do with it.
entities/User.ts
typescript
// A plain object. No dependencies.
export default class User {
  constructor(
    public id: string,
    public name: string,
    public email: string
  ) {}
}
useCases/GetUserProfile.ts
typescript
// The Use Case is an abstract class (an interface).
// It defines WHAT we want to do, not HOW.
import User from '../entities/User';

export abstract class GetUserProfile {
  // We depend on an abstraction (this abstract method),
  // not a concrete implementation like an API call.
  abstract execute(userId: string): Promise<User>;
}
2. Data Layer
Now, we implement the "HOW". We'll create a Repository that follows the GetUserProfile contract.
repositories/UserRepository.ts
typescript
import { GetUserProfile } from '../../domain/useCases/GetUserProfile';
import User from '../../domain/entities/User';
// A data model might look different from the domain entity.
import { UserApiModel } from '../models/UserApiModel';

export class UserRepository implements GetUserProfile {
  async execute(userId: string): Promise<User> {
    // This is where the actual API call happens.
    const response = await fetch(`https://api.example.com/users/${userId}`);
    const userData: UserApiModel = await response.json();

    // Map the API model to our domain Entity.
    // This is crucial! The Domain shouldn't care about API specifics.
    return new User(userData.id, userData.full_name, userData.email_address);
  }
}
3. Presentation Layer
Finally, in our React component, we use the use case to get the data.
screens/ProfileScreen.tsx
typescript
import React, { useState, useEffect } from 'react';
import { View, Text, ActivityIndicator } from 'react-native';
import { UserRepository } from '../../data/repositories/UserRepository';
import User from '../../domain/entities/User';

const ProfileScreen = ({ userId }) => {
  const [user, setUser] = useState<User | null>(null);
  const [loading, setLoading] = useState(true);

  // We instantiate the concrete repository here.
  // In a more advanced setup, you'd use Dependency Injection (DI).
  const getUserProfile = new UserRepository();

  useEffect(() => {
    const fetchUser = async () => {
      try {
        const userData = await getUserProfile.execute(userId);
        setUser(userData);
      } catch (error) {
        console.error('Failed to fetch user:', error);
      } finally {
        setLoading(false);
      }
    };

    fetchUser();
  }, [userId]);

  if (loading) {
    return <ActivityIndicator size="large" />;
  }

  return (
    <View>
      <Text>Name: {user?.name}</Text>
      <Text>Email: {user?.email}</Text>
    </View>
  );
};

export default ProfileScreen;
Why Bother? The Real-World Perks
This might seem like more code upfront, and it is. But the payoff is massive:
Easy Testing: Want to test your
GetUserProfileuse case without hitting a real API? No problem! Create aMockUserRepositorythat returns fake data. Your business logic tests become fast and reliable.Framework Independence: Deciding to migrate from React Native to Expo? Or even to another framework? Your Domain layer is untouched. It's just JavaScript/TypeScript.
Team Scalability: Different teams can work on different layers simultaneously. The UI team doesn't need to understand the intricacies of the API, and the backend team doesn't need to know about React state.
Long-Term Maintainability: When the product manager says, "We're switching from REST to GraphQL," you don't panic. You only need to change the implementation in your Data Layer. The screens and business logic remain blissfully unaware.
Mastering these architectural patterns is what separates hobbyists from professional software engineers. To learn professional software development courses such as Python Programming, Full Stack Development, and the MERN Stack, visit and enroll today at codercrafter.in. Our curriculum is designed to instill these fundamental principles from day one.
Best Practices to Keep it "Clean"
Follow the Dependency Rule Religiously: The inner circles should never import anything from the outer circles.
Keep the Domain Layer Pure: No
useState,useEffect, no framework-specific code, and no API calls. Just pure logic.Use Dependency Injection (DI): Instead of hard-coding
new UserRepository()in your component, pass it in as a prop or use a DI container. This makes testing and swapping implementations a breeze.Be Pragmatic: For a very small app or a prototype, this might be overkill. Use your judgment. But for any project with a potential to grow, start with a clean foundation.
FAQs
Q: Isn't this over-engineering for a simple app?
A: It can be for a "Hello World" app. But the moment you have more than a couple of screens and external data sources, the benefits quickly outweigh the initial setup cost. It's easier to start clean than to refactor a mess later.
Q: What about state management libraries like Redux?
A: They live in the Presentation Layer. Redux is a tool for managing the application state that is derived from your domain logic and user interactions. Your use cases would typically dispatch actions to update the Redux store.
Q: How do I handle navigation?
A: Navigation is an infrastructure concern. You can inject a navigation service (that implements an interface from your domain) into your use cases. This way, a use case can trigger a navigation change without knowing it's using React Navigation under the hood.
Q: This seems complex. Where can I learn to implement this properly?
A: It's a mindset shift, but it becomes second nature. The best way to learn is by building a project with this structure. For a guided, industry-relevant approach, check out the advanced modules in our Full Stack Development program at codercrafter.in, where we build complex, real-world applications using these very principles.
Conclusion: Your Codebase Deserves Better
Adopting Clean Architecture in React Native isn't about blindly following a rulebook. It's about taking control of your codebase and making a conscious investment in the future of your project. It's about writing code that your future self—and your teammates—will thank you for.
The initial learning curve is a small price to pay for the long-term gains in productivity, bug reduction, and overall developer happiness. So, the next time you fire up npx react-native init, think about the layers, separate your concerns, and build something that's not just functional, but truly clean.


