Razorpay Integration: The Ultimate Developer's Guide to Adding Payments in 2025
Want to add seamless payments to your website or app? This in-depth, step-by-step guide covers Razorpay integration from scratch, with examples, best practices, and FAQs. Master modern payment tech today!
Slaying the Payment Dragon: Your No-BS Guide to Razorpay Integration in 2025
Let’s be real. Building the core of your app—the sleek UI, the killer features, the dopamine-hit animations—is the fun part. Then comes the buzzkill: “Okay, now how do we actually get paid?”
Suddenly, you’re plunged into a world of “payment gateways,” “APIs,” “webhooks,” and enough jargon to make your head spin. It feels less like coding and more like filing taxes. If this is you, take a deep breath. You’re about to learn how to integrate one of the most developer-friendly payment solutions out there: Razorpay.
This isn’t just another surface-level overview. We’re going deep. We’ll talk about what it really is, walk through actual integration logic, discuss the “gotchas” nobody tells you about, and arm you with best practices so you don’t just add payments, you build a rock-solid, scalable payment experience. Buckle up.
What the Heck is Razorpay, Actually?
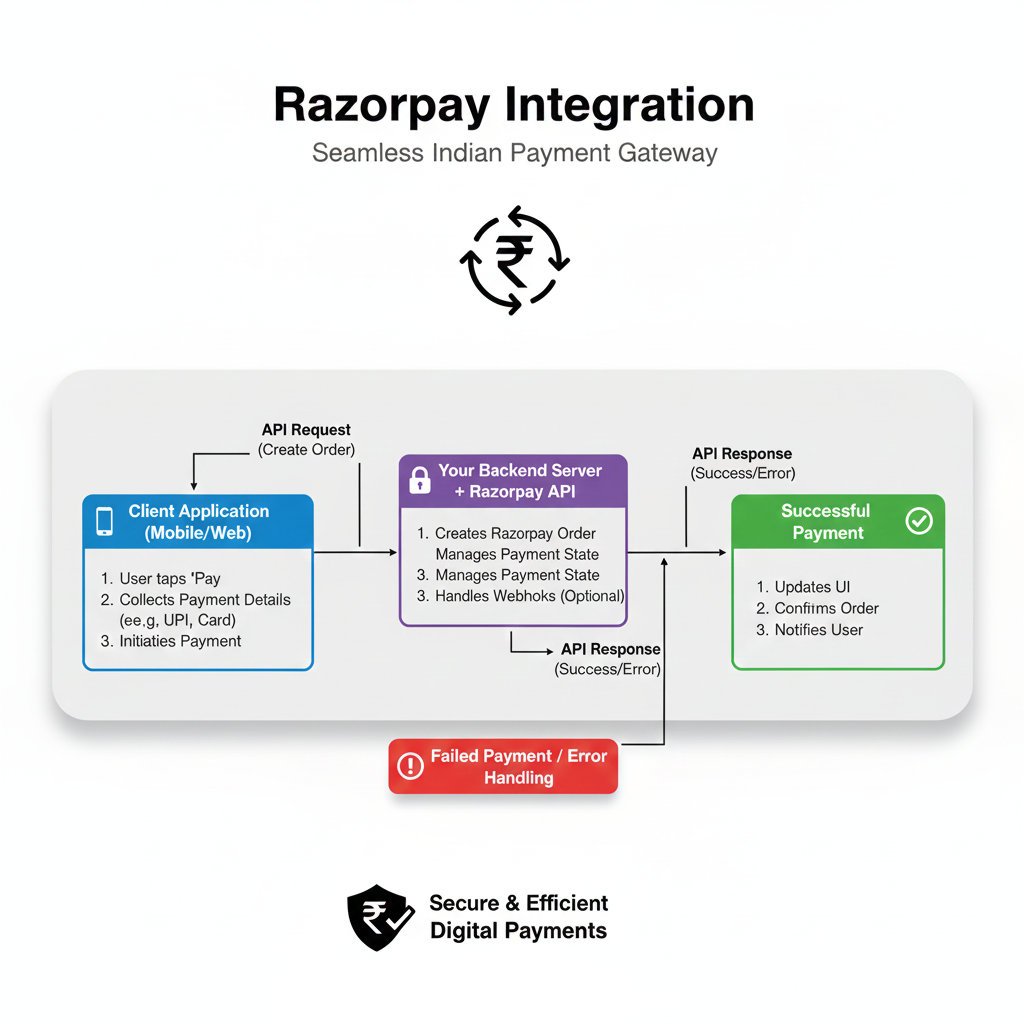
In the simplest terms, Razorpay is a bridge. It’s the trusted middleman between your awesome website/app and the chaotic world of banks, cards, UPI, and wallets.
Think of it like this: You (the merchant) want to collect money from a customer. The customer has money in their bank or Paytm wallet. You can’t just connect directly to every bank in India. Razorpay does that for you. They have pre-built connections (APIs) to all these financial institutions. Your job is just to connect to Razorpay’s simple API.
Why Razorpay Took Off:
Developer First: Their documentation is legendary. Clean, with actual working code snippets in Node.js, Python, PHP, you name it.
The Indian Stack King: They nailed the Indian payment ecosystem early. UPI, Netbanking, popular wallets, BharatQR—they’ve got it all in one package.
No More PCI-DSS Nightmare: Handling raw card data? That’s a security compliance nightmare (PCI-DSS). Razorpay handles all that for you. The card details never touch your server.
The Real-World Magic: How Businesses Use It
It’s not just for giant e-commerce. Here’s how people are using it:
The SaaS Startup: Monthly subscriptions for their project management tool. Razorpay’s Subscriptions API automates recurring billing.
The Online Coach: Selling a one-time recorded course. A simple Payment Link generated in 30 seconds, shared on WhatsApp, does the trick.
The Event Organizer: Selling tickets for a webinar. They use Checkout to let users pick a ticket tier and pay.
The Freelancer: Invoicing a client. They use Smart Collect to generate virtual bank accounts, so the client does a direct bank transfer that Razorpay automatically tracks and confirms.
Getting Your Hands Dirty: A Practical Integration Walkthrough (The Gist)
We’ll focus on the most common method: the Razorpay Checkout. This is where you redirect customers to Razorpay’s secure, hosted payment page. It’s the fastest and safest way to start.
Step 1: The Setup
Head to Razorpay.com, sign up for a test account (it’s free!). You’ll get KEY_ID and KEY_SECRET. These are your API keys. Keep the secret key, well, secret! Never commit it to public GitHub repos. Use environment variables (.env file).
Step 2: The Backend (Server-Side)
Your server needs to create an “order.” An order is like a bill—it tells Razorpay the amount, currency, and a unique receipt ID.
Here’s a super-simple Node.js (Express) example:
javascript
const Razorpay = require('razorpay');
const instance = new Razorpay({
  key_id: process.env.RAZORPAY_KEY_ID,
  key_secret: process.env.RAZORPAY_KEY_SECRET,
});

app.post('/create-order', async (req, res) => {
  const options = {
    amount: 50000, // Amount in paise (₹500.00)
    currency: "INR",
    receipt: `receipt_order_${Date.now()}`,
    payment_capture: 1 // Auto-capture payment
  };
  try {
    const order = await instance.orders.create(options);
    res.json({
      success: true,
      order_id: order.id, // Send this to your frontend!
      amount: order.amount
    });
  } catch (error) {
    res.status(500).json({ error: error.message });
  }
});
Step 3: The Frontend (Client-Side)
Now, take that order.id and load up Razorpay’s magical checkout button.
html
<script src="https://checkout.razorpay.com/v1/checkout.js"></script>
<script>
  async function launchRazorpay() {
    // 1. First, call YOUR backend to create an order
    const response = await fetch('/create-order', { method: 'POST' });
    const data = await response.json();

    // 2. Setup options for Razorpay
    const options = {
      key: "YOUR_KEY_ID_HERE", // From your dashboard
      amount: data.amount,
      currency: "INR",
      name: "My Awesome Store",
      description: "Buying a cool t-shirt",
      order_id: data.order_id, // From your backend
      handler: function (response) {
        // This function runs on SUCCESSFUL payment
        alert(`Payment ID: ${response.razorpay_payment_id}`);
        // YOU MUST VERIFY THIS PAYMENT ON YOUR BACKEND! (More on this below)
      },
      prefill: {
        name: "Customer Name",
        email: "customer@example.com"
      },
      theme: {
        color: "#F37254" // Match your brand
      }
    };
    const rzp = new Razorpay(options);
    rzp.open(); // This pops open the payment modal
  }
</script>
<button onclick="launchRazorpay()">Pay Now</button>
And boom! You have a working payment flow.
⚠️ The CRITICAL Step Everyone Misses: Payment Verification
Here’s the biggest rookie mistake: trusting the frontend handler function as proof of payment. A sneaky user could manually trigger that function. You must verify the payment signature on your backend.
When a payment is successful, Razorpay sends a razorpay_payment_id and a razorpay_signature to your handler. You must send these to your server and verify them using your KEY_SECRET.
javascript
// Backend Verification Route (Node.js)
app.post('/verify-payment', (req, res) => {
  const { payment_id, order_id, signature } = req.body;
  const crypto = require('crypto');

  // Create the signature you expect
  const generatedSignature = crypto
    .createHmac('sha256', process.env.RAZORPAY_KEY_SECRET)
    .update(order_id + "|" + payment_id)
    .digest('hex');

  // Compare with the signature Razorpay sent
  if (generatedSignature === signature) {
    // Payment is LEGIT. Now update your database, grant access, send email.
    res.json({ status: 'success' });
  } else {
    // Payment is FRAUDULENT. Do not fulfill the order.
    res.status(400).json({ status: 'failure' });
  }
});
Best Practices: From Working to Professional
Always Use Webhooks: The
handlercan fail if the user closes the tab right after paying. Set up a webhook in your Razorpay dashboard. Razorpay will send a server-to-server POST request to your provided URL on every payment event (payment.captured,payment.failed). This is the most reliable way to update your system.Store the Right IDs: In your database, always store the
razorpay_order_idandrazorpay_payment_id. They’re your reference for any support or refunds.Handle Failures Gracefully: Not all payments succeed. Use the
modalevent handlers (.on('payment.failed', ...)) to show user-friendly error messages.Test Thoroughly in Sandbox: Use Razorpay’s test cards (like
4111 1111 1111 1111) to simulate success, failure, and different banks without using real money.Security is Non-Negotiable: Never, ever expose your
KEY_SECRET. All operations involving it (creating orders, verifying signatures, handling webhooks) must happen on your backend server.
FAQs: Quick-Fire Answers
Q: How much does it cost?
A: Standard pricing is 2% per transaction for Indian cards/UPI/netbanking. International cards cost more. Check their latest pricing page.
Q: Can I use it for international payments?
A: Yes! Razorpay supports multiple currencies and international cards.
Q: Is it only for Indian businesses?
A: Primarily, yes. The company is India-focused, but they have solutions for global settlements.
Q: How long does it take to get live?
A: The API integration can be done in a day. Getting your account activated for live transactions requires KYC and can take 2-7 business days.
Q: Refunds?
A: Yes, you can initiate full or partial refunds via the dashboard or API directly. Funds are returned to the original source.
Conclusion: Your Payment Superpower
Integrating Razorpay isn’t about being a payments expert. It’s about leveraging a powerful, well-documented API to solve a business problem elegantly. You’ve now seen the flow: create order, launch checkout, verify signature, handle webhooks. It’s a pattern you can replicate in any project, big or small.
Mastering integrations like this is what separates hobbyist coders from professional developers who can build full-fledged, revenue-generating applications. The ability to connect different services (payments, auth, email, databases) is the essence of modern full-stack development.
Speaking of becoming a pro, if you’re fired up about building real-world applications from the ground up—mastering not just frontend and backend, but also crucial integrations, system design, and deployment—you should check out a structured learning path. To learn professional software development courses such as Python Programming, Full Stack Development, and MERN Stack, visit and enroll today at codercrafter.in. We break down complex topics like this into manageable, project-driven modules to turn you into a job-ready developer.
Now go forth, integrate, and get paid! 💸 Remember, the code snippets here are your starting point. Dive into the official Razorpay docs—they’re your new best friend


