Back to Blog
React Native

Build a Full Mobile App Backend: Appwrite + React Native Guide (2025)

12/8/2025
5 min read
Build a Full Mobile App Backend: Appwrite + React Native Guide (2025)

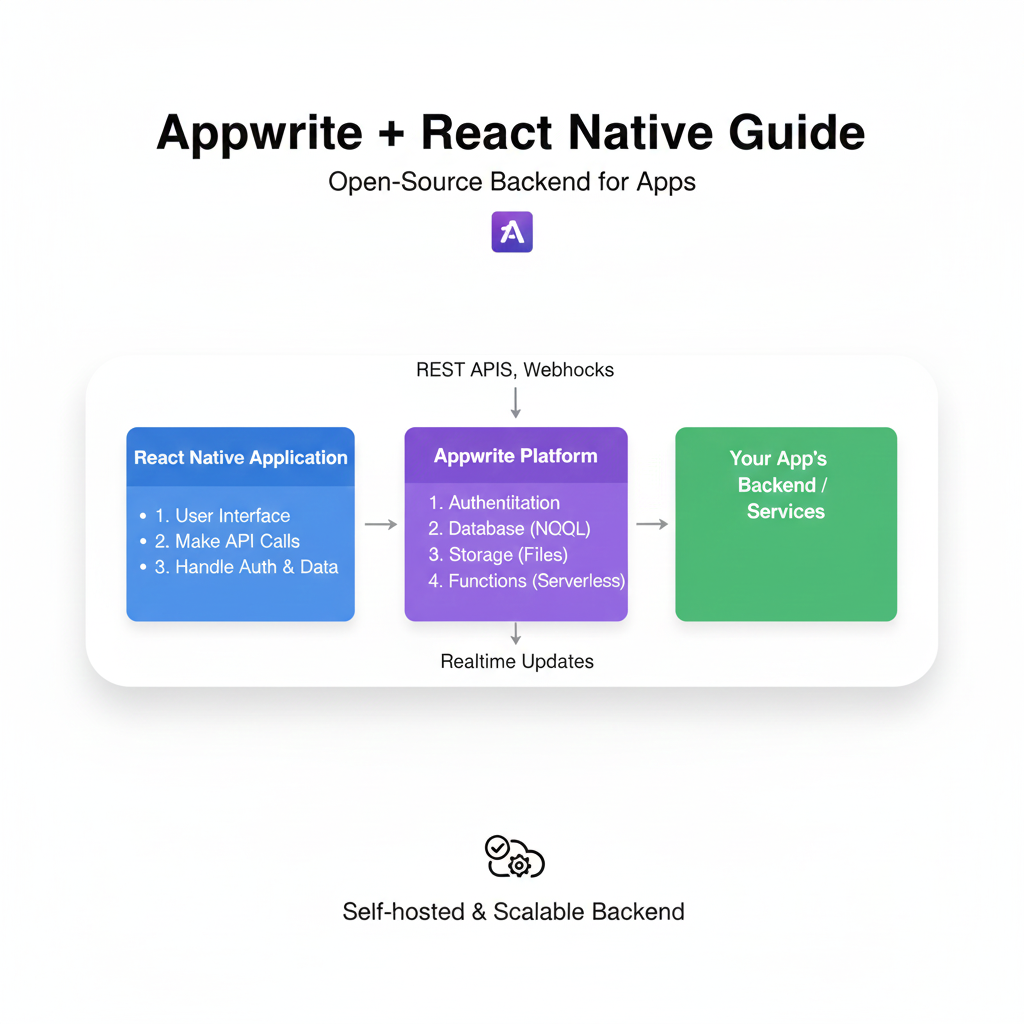
Step-by-step guide to integrating Appwrite with React Native. Learn authentication, databases, storage, and real-time features with code examples. Build pro mobile apps faster.

Build a Full Mobile App Backend: Appwrite + React Native Guide (2025)

Build a Full Mobile App Backend: Appwrite + React Native Guide (2025)

Appwrite + React Native: Build a Scalable Mobile App Backend Like a Pro

Let’s be real for a second. Building a mobile app is exciting. You’ve got your React Native environment set up, your UI components are looking slick, and you’re riding that wave of creative energy. Then, it hits you. The backend.

Suddenly, you’re drowning in thoughts of user authentication, database schemas, cloud storage, server configuration, and deployment nightmares. It’s enough to kill the vibe for even the most passionate dev. What if I told you there’s a way to get all that backend functionality—auth, databases, file storage, even real-time features—without managing a single server?

Enter Appwrite. It’s not just another tool; it’s practically a cheat code for indie devs and startups. And when you pair it with React Native, you get a powerhouse combo for building full-stack mobile apps at warp speed.

In this deep dive, we’re going to move beyond the basic “hello world” tutorials. We’ll configure Appwrite for a React Native project, implement core features, discuss real-world use cases, and arm you with best practices. Buckle up.

What Exactly is Appwrite? (In Plain English)

Think of Appwrite as your app’s digital butler. You tell it what you need (“Jeeves, please store this user’s profile picture and ensure only they can see their documents”), and it handles the heavy lifting—securely, reliably, and with a clean API.

Technically, it’s an open-source Backend-as-a-Service (BaaS) platform. You can self-host it on your own infrastructure (giving you insane control) or use their cloud version for zero-ops. It packages complex backend services into simple SDKs.

Core Services You’ll Actually Use:

  • Authentication: Email/Password, OAuth2 (Google, Apple, Facebook, etc.), Magic URL, Anonymous sessions. No more rolling your own auth (a security minefield).

  • Databases: NoSQL databases with permission-based access down to the document level. Create collections, define schemas, and query with ease.

  • Storage: Upload, preview, and manage files. Set up buckets (like folders) and control who can view or upload what.

  • Realtime: Subscribe to channels (e.g., databases.collections.documents) and get live updates pushed to your app. Perfect for chat, live scores, or collaborative features.

  • Functions: Serverless functions for your custom backend logic, triggered by events or HTTP calls.

Why This Combo is a Game-Changer for React Native Devs

  1. Focus is Your Superpower: Instead of context-switching between frontend logic and backend DevOps, you stay in your React Native flow. Your UI and Appwrite’s API are your entire world.

  2. Launch Faster, Iterate Quicker: Need a new data field? Update your collection rule in Appwrite Console. Need social login? Enable it with a few clicks. Your go-to-market time shrinks dramatically.

  3. Security You Can Trust: Appwrite bakes in security best practices. SSL, permission models, and secure environment variables mean you’re not accidentally building a data leak.

Getting Your Hands Dirty: A Practical Setup Guide

Enough theory. Let’s build.

Step 1: The Foundation
First, spin up an Appwrite instance. For this guide, let’s use the cloud version (easiest start). Head to cloud.appwrite.io, sign up, and create a new project. Note down your Project ID and API Endpoint from the settings.

Step 2: React Native Prep
Create a new React Native app if you haven’t:

bash

npx react-native init MyAppwriteApp
cd MyAppwriteApp

Now, install the Appwrite SDK for React Native:

bash

npm install react-native-appwrite

For iOS, navigate to the ios directory and run pod install.

Step 3: The Client Configuration
Create a service file, say appwrite.js, to initialize your client. This keeps things clean.

javascript

// services/appwrite.js
import { Client, Account, Databases, Storage } from 'react-native-appwrite';

const client = new Client();

client
    .setEndpoint('https://cloud.appwrite.io/v1') // Your API Endpoint
    .setProject('YOUR_PROJECT_ID')              // Your Project ID
    .setPlatform('com.codercrafter.myapp')      // Your app bundle ID
;

export const account = new Account(client);
export const databases = new Databases(client);
export const storage = new Storage(client);

export default client;

Step 4: Implementing Killer Features (With Code!)

A. User Authentication (The Gateway)
Here’s how to create an account and start a session.

javascript

// screens/SignupScreen.js
import { account } from '../services/appwrite';

const SignupScreen = () => {
    const [email, setEmail] = useState('');
    const [password, setPassword] = useState('');
    const [name, setName] = useState('');

    const handleSignup = async () => {
        try {
            await account.create(
                ID.unique(), // Helper to generate unique IDs
                email,
                password,
                name
            );
            // Log the user in immediately
            const session = await account.createEmailPasswordSession(email, password);
            console.log('User logged in!', session);
            // Navigate to home...
        } catch (error) {
            console.error('Signup failed:', error.message);
        }
    };
    // ... rest of your UI
};

B. Working with the Database (Your App’s Memory)
Let’s say we’re building a “Task Manager.” First, create a Tasks collection in the Appwrite Console with attributes: title (string), isComplete (boolean), userId (string).

javascript

// services/database.js
import { databases, ID, Query } from './appwrite';

const DATABASE_ID = 'YOUR_DB_ID';
const COLLECTION_ID = 'tasks';

export const createTask = async (title, userId) => {
    return await databases.createDocument(
        DATABASE_ID,
        COLLECTION_ID,
        ID.unique(),
        { title, isComplete: false, userId }
    );
};

export const getUserTasks = async (userId) => {
    return await databases.listDocuments(
        DATABASE_ID,
        COLLECTION_ID,
        [ Query.equal('userId', userId) ] // Powerful filtering
    );
};

C. Real-time Magic (Live Updates)
Make your task list update live when a new task is added elsewhere.

javascript

// components/TaskList.js
import { client } from '../services/appwrite';
import { Realtime } from 'react-native-appwrite';

useEffect(() => {
    const unsubscribe = client.subscribe(
        `databases.${DATABASE_ID}.collections.${COLLECTION_ID}.documents`,
        (response) => {
            // This fires on any create, update, or delete event
            if (response.events.includes('databases.*.collections.*.documents.*.create')) {
                console.log('A new task was created LIVE!', response.payload);
                // Update your local state, no refresh needed
            }
        }
    );

    return () => unsubscribe(); // Cleanup on unmount
}, []);

Real-World Use Cases: What Can You Actually Build?

  1. Social Media Lite: Auth for profiles, databases for posts/comments, storage for images/videos, real-time for notifications and live feeds.

  2. E-Commerce App: Product catalogs (databases), user accounts & order history (auth + databases), product images (storage).

  3. Fitness Tracker: User profiles, workout logs (databases), progress photos (storage), real-time leaderboards for challenges.

  4. Project Management Tool (like a simple Trello): Tasks, columns (databases), file attachments (storage), real-time updates when a team member moves a card.

Best Practices to Avoid Headaches

  • Permissions are King: Never use the “wildcard” (*) permission in production. Always set read/write permissions precisely using the Appwrite Console. Use role:member for authenticated users and userId checks for user-owned data.

  • Environment Variables: Never hardcode your Project ID or API keys. Use react-native-config to manage them securely.

  • Error Handling is UX: Wrap every Appwrite call in try/catch blocks. Don’t just log the error; show user-friendly alerts. Network failures will happen.

  • Structure Your Project: Use a clear service layer (like our appwrite.js file). It makes your code cleaner, easier to test, and simpler to debug.

  • Start with the Console: Play with the Appwrite Console (your web admin panel) first. Create collections, test rules, and understand the data model before writing frontend code.

FAQs (Stuff You’re Probably Wondering)

Q: Is Appwrite really free?
A: The open-source version is 100% free forever for self-hosting. The cloud version has a generous free tier perfect for learning and launching small projects. Always check their latest pricing for scaling.

Q: Can I use it with Expo?
A: Absolutely. The react-native-appwrite SDK works with the Expo managed workflow. You might need to prebuild (expo prebuild) for certain configs, but it’s well-supported.

Q: How does it compare to Firebase?
A: Firebase is great but can feel like a “walled garden.” Appwrite is open-source, gives you more data ownership/portability, and often feels more intuitive for SQL-like queries. Firebase has more mature services like Analytics and Crashlytics, which Appwrite is catching up on.

Q: Is it production-ready?
A: For many use cases, yes. Major companies use it. However, as with any tech, you must evaluate it against your specific scalability, compliance, and feature requirements. For most MVPs and mid-sized apps, it’s more than capable.

Wrapping Up: Your Backend Superpower Awaits

The Appwrite and React Native combo genuinely flattens the learning curve for full-stack mobile development. It removes the largest bottleneck—backend complexity—and lets you channel your energy into what makes your app unique: the user experience and the core product logic.

Remember, tools like this are force multipliers. They don’t replace the need for solid programming fundamentals; they amplify them. Understanding how auth flows work, how databases are structured, and how APIs communicate is what allows you to wield a tool like Appwrite effectively.

Ready to build more than just a frontend? This is just the tip of the iceberg. To dive deeper and master the full spectrum of modern development—from backend architecture with tools like Appwrite to advanced frontend frameworks—consider structured learning.

To learn professional software development courses such as Python Programming, Full Stack Development, and MERN Stack, visit and enroll today at codercrafter.in. We break down complex topics into manageable, project-based lessons to turn you into a well-rounded developer.

So, what are you waiting for? Fire up your terminal, initialize a new Appwrite project, and start building that app idea you’ve been sitting on. The backend is no longer a barrier. It’s your launchpad.

Related Articles

Call UsWhatsApp